How to configure Sugar CRM with Monema
Configure Sugar CRM
The SugarCRM connector allows you to keep an immediate record of your phone interactions with your contacts within your CRM automatically. In conjunction with the PBX it supports the following features:
- Records incoming and outgoing calls from the switchboard in SugarCRM.
-
- Relates calls to the contact or account that has been assigned the phone number of the call. In case of incoming calls the number from which it is called, and in case of outgoing calls the number called. By accessing each Sugar contact or account it is possible to view their call history.
- The call is related to the SugarCRM user that has the extension that receives or makes the call.
-
- It sets the identifier on incoming calls with the name of the contact or account that is calling so you can see who is calling if you have it included in SugarCRM.
- Presents notifications in Sugar to the user assigned to an extension when the extension receives the call.
-
- The notifications are linked to the SugarCRM contact and can be accessed at the time.
- These notifications allow you to save a text associated with the call in SugarCRM while it is receiving the call (reason for the call, topics covered, result of the call …).
- It is possible to create a new contact in SugarCRM from an unidentified phone number.
-
- Make calls from the SugarCRM interface. Next to each phone number present in Sugar there is a button that when pressed will generate a call from the SugarCRM user’s extension to the phone number.
Installation
The SugarCRM connector allows you to keep an immediate record of your phone interactions with your contacts within your CRM automatically.
Requirements
The requirements to be met by SugarCRM are as follows:
- SugarCRM version 6.
- Possibility of adding modules to SugarCRM.
- Web access to the Sugar root directory.
Installation in SugarCRM
First you must request the SugarCRM Connector and the activation of the module from the supplier of the virtual PBX. With this file saved in your computer and an administrator level user in Sugar you must enter the Admin area, whose access is in the upper right corner of the SugarCRM page.

Within Admin access the Module Loader which is usually found in the Development Tools section. Once in the Module Loader press Browse to select the connector file on your computer and then press Upload.
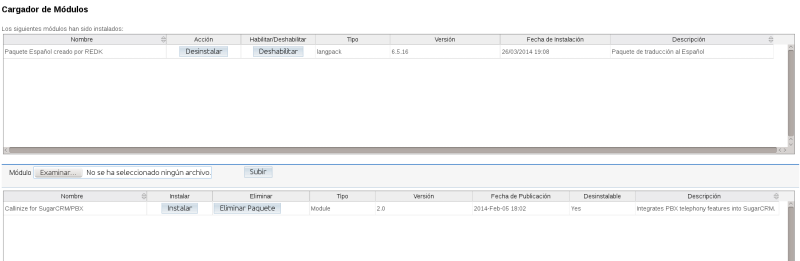
The module will appear in the lower box with an option to Install that you must execute. Once the module is installed it should appear in the upper box. You have already installed the connector but you still need to configure SugarCRM and its virtual PBX.

Finally it is necessary to add the necessary fields to the user’s card. To do this follow the next steps:
- From the Admin section access to Studio.
- Deploy in the Modules section located on the left side Users > Design > Edit view.
- Add a new panel with the name PBX Connector.
- Within the new panel drag the Personal Extensions, Call Button and Call Notice fields.
- Click Save and Expand.
Settings in SugarCRM
General configuration
To configure the connector you must return to Admin and in the Callinize – Asterisk SugarCRM Integration section access the Module Configuration.

Inside the module configuration you must configure the following fields:
- PBX server: indicate the server you are connecting to to access the PBX control panel (e.g. c001.voip-sys.com).
- PBX user: the administrator user of your virtual PBX.
- PBX user password: the password of the PBX administrator user.
- SugarCRM Soap User: a SugarCRM administrator user.
- SugarCRM Soap Password: the password of the SugarCRM administrator user.
- Outgoing call prefix: indicate the prefix you must dial in your PBX to call abroad (usually 0).
- PBX country code: the default country code of the virtual PBX (in the case of Spain 34).
The rest of the fields can be left with the default value. Go to the bottom of the form and press Save.

Users configuration
Now you only have to configure the extension that corresponds to each user of SugarCRM. To do this again from Admin look for the Users section and access User Management.

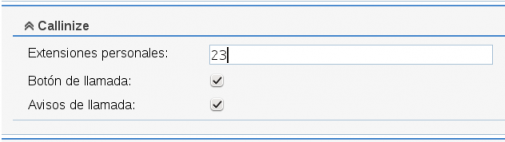
From there you must access to each user whose calls you want to monitor, press Edit and fill in the fields in the section Switchboard connector. Namely:
- Personal extensions: the user’s extension will be indicated. In case the user has several extensions we will separate them with commas.
- Call button: when the user enters a contact file, he will be able to make a call by pressing an icon that will appear next to the phone number.
- Call alerts: the user will receive a notification
Once the users have been configured, all that remains is to configure the switchboard. You can do this from the Control Panel within the Configuration module in the CRM section.
SugarCRM connector manual
The various functions of the connector are described in more detail below.
Call logging
It is possible to access the received calls from the following points in SugarCRM:
- In the upper menu of SugarCRM > Activities > Calls you can consult all the calls made and received.
- In the tabs of contacts, accounts and users in the section History the calls are listed along with other interactions such as emails.

Notifications
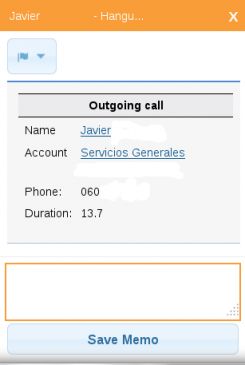
The notifications, in case they are configured for a certain user validated in SugarCRM, will appear in the lower right corner of the SugarCRM interface. The notifications present at the top the name of the contact or has access to it or in case of unrecognized numbers the phone number. Immediately below it will appear an icon that allows you to relate the call to a contact or account already created or to create a new contact. Finally in the lower part of the notification it is possible to write a note referring to the content of the call that can be consulted later.
Call generation
The SugarCRM connector also allows you to make calls from SugarCRM without picking up the phone and dialing. Simply access a contact, account, user or opportunity tab and press the green icon next to the phone number. This will create a call that will arrive to the extension related to the user and when picking up the phone it will call the selected number.
![]()